
Crown molding isn’t just a fancy trim; it’s the cherry on top of your home’s decor. Imagine walking into a room and feeling like royalty, all thanks to a few carefully placed pieces of wood. It’s like giving your walls a stylish hat—who wouldn’t want that? Installing crown molding can transform any space from drab to fab faster than you can say “DIY project.”
Overview of Installing Crown Molding
Installing crown molding adds elegance to any room. Measuring accurately is crucial for success. Gather necessary tools like a miter saw, measuring tape, and nail gun. Marking wall locations ensures precise cutting and fitting of the molding.
Cutting miters at precise angles is essential for seamless corners. Often, corners require 45-degree cuts, which helps pieces fit snugly together. Applying adhesive on the back of each piece enhances stability and helps with positioning.
Nailing molding into place provides additional support. Use finishing nails to secure each end and along the length. Caulking gaps conceals imperfections, ensuring a polished look.
Painting or staining the molding complements existing décor. Selecting a color that matches the room’s palette enhances visual appeal. Installing crown molding typically takes several hours, depending on room size and complexity.
Choosing materials influences the overall aesthetic and cost of the project. Options range from medium-density fiberboard to solid wood, allowing for various budgets and styles. Each type contributes uniquely to the achieved look.
Completing this project yields significant satisfaction, transforming a space dramatically with minimal effort. Crowning moments achieved through this installation process elevate any home’s interior design.
Tools and Materials Required
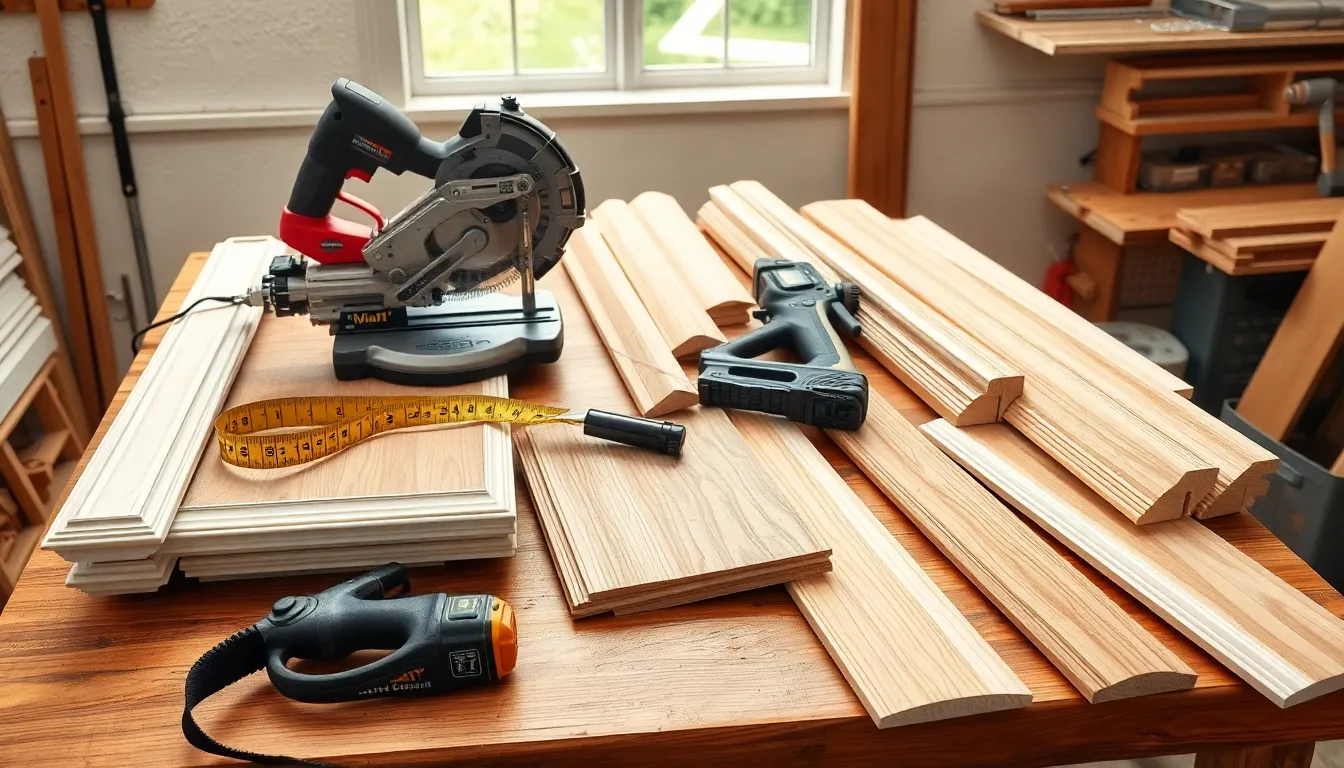
Successful installation of crown molding relies on having the right tools and materials. These items ensure a smooth and efficient process, leading to professional-looking results.
Essential Tools
A miter saw is crucial for making accurate angled cuts. Measuring tape allows for precise measurements along walls. A nail gun speeds up the installation process, securely fastening the molding in place. Caulking guns are needed to fill gaps and achieve a seamless appearance. Finally, a level helps ensure proper alignment to create straight lines on the walls.
Recommended Materials
Medium-density fiberboard (MDF) offers an affordable and versatile option for crown molding. Solid wood provides a classic look with added durability, though it comes at a higher cost. Polyurethane materials are lightweight and can mimic the appearance of wood without the weight. Paint or stain can enhance the final appearance, allowing for customization to match existing decor. Consider the project’s budget when selecting materials for an effective transformation.
Preparation Steps
Preparation is crucial for a successful crown molding installation. Each step ensures accuracy and enhances overall results.
Measuring and Planning
Accurate measurements lay the foundation for proper installation. Begin by measuring the length of each wall where the molding will sit. Record these measurements, taking note of any obstacles like doors and windows. Plan for necessary cuts at corners, typically requiring angles of 45 degrees. Use a measuring tape for precision, and mark your walls clearly. Sketch a layout to visualize the design and identify how many pieces of molding are needed. Completing this step ensures an efficient installation process, saving time and materials.
Choosing the Right Style
Selecting the appropriate crown molding style impacts the room’s aesthetic. Options range from simple designs to intricate styles. Traditional crown molding features ornate details, while modern styles emphasize sleek lines. Consider existing decor to ensure cohesive design. Choose materials that align with your vision, whether opting for MDF, solid wood, or polyurethane. Explore profiles to match the home’s character; various styles cater to different tastes. Making these choices in advance streamlines installation and enhances the room’s overall appeal.
Installation Process
The installation process for crown molding requires careful attention to detail and precision. Following the right steps ensures a seamless finish.
Marking the Walls and Ceiling
Accurate marking of walls and ceilings is foundational. First, homeowners should measure each wall’s length and mark these measurements. Using a level, it’s important to draw a straight line across the wall at the desired height for the molding. This line serves as a guide for attaching the molding. For corners, marking angles is essential; clearly indicate where each piece will meet to guarantee an ideal fit.
Cutting the Molding
Cutting the molding accurately directly impacts the installation’s outcome. Start by measuring the length of each wall segment. Miter saws are recommended for making precise cuts at 45-degree angles for corners. Ensuring each piece fits snugly into position minimizes gaps. It’s helpful to cut a small test piece first, verifying angles and lengths before proceeding with larger segments.
Securing the Molding
Securing the molding involves using adhesive and nails effectively. First, apply construction adhesive to the back of each molding piece. Ensure proper alignment along the marked lines before pressing it against the wall. After positioning, use a nail gun to fasten the molding in place with finishing nails, spacing them about 12 inches apart. This technique provides strong support and stability, allowing for a polished finish.
Finishing Touches
Finishing touches complete the crown molding project, adding the final aesthetic appeal. Focus on both caulking and painting to ensure a professional look.
Caulking and Painting
Caulking fills gaps between the molding and the walls or ceilings, creating a seamless appearance. Using a caulk gun, apply a small bead along any visible seams. Smooth the caulk with a damp finger or a caulking tool for a clean finish. After caulking, painting the crown molding enhances its visibility and complements the room’s decor. Choose a paint color that matches or contrasts with the wall color for an attractive effect. Brush or roll on the paint evenly, ensuring full coverage. For optimal results, let the initial coat dry completely before applying a second coat. The entire process transforms the molding into a standout feature.
Cleaning Up
Cleaning up post-installation is crucial for maintaining a tidy workspace. Gather tools and materials immediately after installation to avoid clutter. Dispose of any leftover molding pieces and packaging properly. Wipe down surfaces to remove dust and debris generated during the process. Use a damp cloth to clean any excess caulk or paint smudges from the walls and ceilings. Finally, store tools in their designated places to keep the workspace organized. Completing these tasks ensures a professional finish to the crown molding installation and sets the tone for enjoying the newly transformed space.
Installing crown molding can significantly enhance a home’s aesthetic appeal while providing a sense of sophistication. With the right tools and careful attention to detail, anyone can achieve a professional-looking finish. The process may seem daunting at first, but breaking it down into manageable steps makes it accessible for DIY enthusiasts.
Choosing the right materials and styles ensures that the crown molding complements existing decor, creating a cohesive look throughout the space. After installation, the finishing touches like caulking and painting elevate the overall appearance, transforming any room into a stylish haven. This project not only adds visual interest but also offers a rewarding sense of accomplishment upon completion.