
A Nest thermostat sits dark and silent on your wall when it should be warming or cooling your home. It’s frustrating, and the longer it stays offline, the more uncomfortable your house becomes. The good news: most Nest thermostat not turning on issues stem from simple power, connectivity, or configuration problems that homeowners can fix in 10–30 minutes without calling an HVAC technician. This guide walks through the most common culprits and their solutions, starting with what’s easiest to check and progressing to more involved troubleshooting.
Table of Contents
ToggleKey Takeaways
- Most Nest thermostat not turning on issues can be resolved in 10–30 minutes by checking power sources, wiring connections, and WiFi settings without calling a technician.
- Verify your C-wire (common wire) is securely connected and free of corrosion—loose or corroded terminals are the most common power problem preventing Nest startup.
- A soft reset (turn off power for 30 seconds then restart) and force restart (holding the reset button) clear temporary glitches and startup loops.
- Nest thermostats require a 2.4GHz WiFi network and won’t connect to 5GHz-only routers; verify your network band is enabled and re-enter your WiFi password carefully.
- Check HVAC system compatibility by confirming your furnace has a 24V transformer and standard thermostat terminals (W1, Y/Y1)—incompatible systems won’t respond even with power.
- Disable Eco mode, unlock child lock, and ensure your schedule is active in the Nest app, as disabled settings prevent heating and cooling from engaging.
Check Your Power Source and Wiring Connections
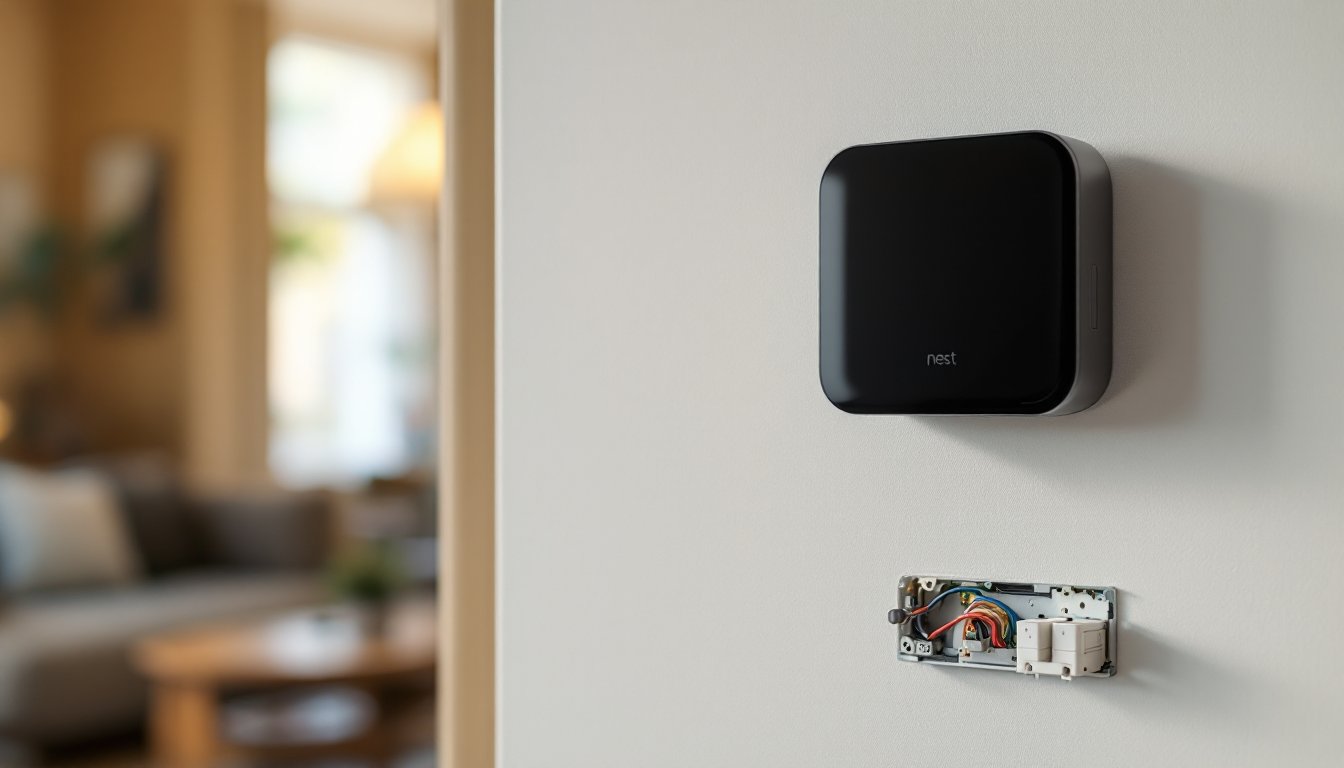
Before diving into software fixes, verify the thermostat is actually receiving power. Start by looking at the display. If it’s completely dark with no glow, no time, and no icons visible, you’ve got a power problem.
First, turn off power to your HVAC system at the main breaker and the furnace switch (usually a lever on the side of the furnace). Remove the Nest faceplate by gently pulling it away from the wall, it clips on magnetically, so no screws to worry about. You’ll see a thin metal plate with wires attached: this is the base station.
Look at the wiring terminals. Most homes have either a C-wire (common wire, usually black) and a Rh or Rc wire (24V power from the heat or cool transformer), or a Power Extender Kit installed. Check for:
• Loose wire connections. Even a slightly loose terminal can cut power completely.
• Corroded terminals. Copper turns green, indicating oxidation that blocks current flow.
• Missing wires entirely. If you see an empty terminal where a wire should be, you may have a disconnection.
Gently tighten any loose connections using a small flathead screwdriver, turn clockwise, but don’t overtighten. If a wire looks corroded, carefully remove it and use fine-grit sandpaper or a pencil eraser to clean the exposed copper end, then reinsert it.
If you don’t have a C-wire (common), your Nest can run on battery for a few hours, but it needs that common wire or a Power Extender Kit for sustained operation. Lack of a C-wire is a frequent culprit in older homes. Restore power, wait 30 seconds, and check the display. If light returns, you’re halfway there.
Restart Your Nest Thermostat
A soft reset often clears temporary glitches that prevent startup. Turn off power at the breaker and furnace switch again, leave it off for 30 seconds (this discharges the device), then flip both switches back on. Wait another 30 seconds and look for signs of life on the display.
If the display shows a boot-up screen (Google logo, loading indicator, or “Starting up”) but then goes dark again, you may be stuck in a startup loop. This sometimes happens after a firmware update or power surge.
For a force restart, pull the faceplate off and hold the base station’s reset button (a small, recessed button usually found on the back or edge of the metal plate) for 10 seconds while the power is on. Release it, wait 60 seconds, and watch for the startup sequence.
If the screen flickers or dims on its own, your battery may be failing. Nests have a rechargeable battery that can degrade over 3–5 years. If it’s not charging from the C-wire and your battery is old, the device won’t stay powered. In this case, battery replacement (a professional service) or upgrading to a newer Nest model may be necessary.
Verify Your WiFi Connection and Network Settings
Once the display is on, check your WiFi connection. On the Nest’s home screen, tap Settings > Network. If it shows “Not Connected” or no WiFi network listed, the thermostat can’t reach your router or your network credentials are wrong.
First, confirm your router is online and broadcasting a 2.4GHz network (Nest thermostats require 2.4GHz: they don’t support 5GHz-only networks). If your router is dual-band, ensure the 2.4GHz band is enabled in your router settings.
On the Nest, select Settings > Network > WiFi > Add Network. Choose your network name and re-enter your WiFi password carefully. Passwords are case-sensitive, if you mistype a single character, the connection fails silently.
If you’re still not connecting, your router may have a firewall rule or MAC filtering enabled that blocks the Nest. Log into your router’s admin panel (usually printed on the router’s back), navigate to Security or MAC Filter, and ensure the Nest’s MAC address isn’t on a blocklist. You can find your Nest’s MAC address in Settings > Network > WiFi > Device Info.
If you’re unsure about router settings, a home tech guide from Digital Trends covers smart home networking in detail. A stable connection is essential, without it, the Nest can’t receive firmware updates, communicate with your HVAC system remotely, or store schedule data in the cloud.
Review Your HVAC System and Compatibility
Your Nest is turning on, but your heating or cooling isn’t engaging. This points to an HVAC compatibility or wiring issue. Nest thermostats work with most 24-volt systems (furnaces, air conditioners, heat pumps), but not all.
Common incompatible setups include:
• Two-stage or modulating boilers that require special control signals.
• Multi-zone systems with dampers, Nest is single-zone and won’t manage them.
• Line voltage systems (240V wall heaters or baseboard electric heat) that don’t use 24V thermostat wires.
• Spark ignition or millivolt furnaces in very old homes (pre-1980s) that can’t interface with modern thermostats.
To verify, check your furnace’s nameplate or manual. Look for 24V transformer, W1/W terminal (heat call), and Y/Y1 terminal (cooling call). If you see these, your system is likely compatible.
If your system is incompatible, the Nest will power on but won’t trigger HVAC operation no matter what temperature you set. No reset or WiFi fix will help. In that case, consult an HVAC technician, they can sometimes add a compatible thermostat control interface, but compatibility varies by furnace model.
Also verify the Nest recognizes your system. In the Nest app, go Settings > Thermostat > Equipment Control and confirm it shows your furnace and air conditioner (or heat pump). If these show “Not detected,” wiring is incomplete or miswired. Trace each wire from the thermostat base to the furnace control board and ensure they match the Nest’s setup guide for your system type.
Update Firmware and App Settings
Outdated firmware sometimes causes startup failures or system communication drops. If your Nest is powered on and connected to WiFi, firmware updates usually happen automatically overnight. But, you can force a check manually.
In the Nest app, navigate to Settings > Thermostat > About. If an update is available, you’ll see a prompt. Tap Update and let it run, don’t interrupt power during this process. Updates typically take 2–5 minutes, and the display may go dark briefly: this is normal.
After updating, restart your Nest (breaker off/on) and check the app. If the thermostat still won’t engage your HVAC, review your schedule and temperature settings in the app.
Common app-side issues:
• Schedule disabled. If your schedule is paused or set to “Away,” the system won’t heat or cool. Tap Schedule in the app and confirm it’s active and set to comfort temperatures.
• Eco mode enabled. In cold months, Eco mode stops heating below a set temperature (default 62°F). Check Settings > Thermostat > Eco > Heat and adjust if needed.
• Thermostat locked. If child lock is on, temperature changes are blocked. Go Settings > Thermostat > Lock and disable it.
While reviews on smart home systems at Tom’s Guide emphasize Nest’s user-friendly design, settings can be counterintuitive for first-time users. Double-check these before calling for service.
When to Call a Professional
If you’ve walked through every step above and your Nest still won’t power on or trigger your HVAC system, it’s time to call a licensed HVAC technician or electrician. Red flags include:
• No power at all. If the display remains dark after verifying wiring and resetting, the Nest hardware is likely faulty or your furnace transformer has failed.
• System incompatibility confirmed. If your furnace isn’t 24V or doesn’t have standard thermostat terminals, retrofitting requires professional wiring work.
• Frequent power loss or resets. This suggests an unstable electrical supply or a failing C-wire connection deep in your walls, which demands a certified professional’s diagnostic tools.
• Wiring confusion. If you’re unsure which wires go where, stop and hire help. Miswired thermostats can damage furnace control boards (repair: $300–800) or prevent proper operation.
An HVAC technician can verify furnace output with a multimeter, ensure all thermostat wires are secure, and replace a faulty Nest unit under warranty if necessary. Many offer free diagnostics. Use platforms like HomeAdvisor to find local contractors who specialize in Nest installations and support.
If the Nest is still under warranty (typically two years from purchase), contact Google Nest support first, they may authorize a replacement shipped to your door at no cost.
Conclusion
A non-responsive Nest thermostat is rarely a total loss. In nine out of ten cases, power, wiring, WiFi, or a simple setting is the culprit. Start with the power source, move through a restart and network check, verify HVAC compatibility, and update firmware. Most homeowners resolve the issue in under an hour. If nothing works, a professional HVAC technician has the tools and know-how to pinpoint deeper electrical or compatibility issues. Stay patient, document what you’ve tried, and your home will return to comfortable temperatures soon.


