
Your office chair is deceptively complex. What feels like a simple seat and backrest is actually a carefully engineered system of mechanical and material components working together to keep you comfortable for eight hours a day. Whether you’re troubleshooting a wobbly base, replacing worn casters, or just trying to understand why your chair keeps sinking, knowing the names and functions of office chair parts makes repairs easier and helps you make smarter replacement decisions. This guide walks you through every major component, from the foundation up, so you can diagnose problems, perform basic maintenance, and understand when to call for professional help.
Table of Contents
ToggleKey Takeaways
- Office chair parts like the hydraulic cylinder, casters, and base work together as a complex system, and understanding each component helps you diagnose problems and make informed repair decisions.
- Common office chair issues—sinking seats, wobbly bases, squeaking noises, and worn casters—are often DIY-friendly repairs that cost $15–$80 per part, making them more economical than replacement.
- Casters come in soft and hard varieties; using the correct type for your floor prevents damage and ensures smooth rolling, with replacements available for $15–$40.
- The hydraulic cylinder is the most critical office chair part for height adjustment and fails in two ways: either the chair won’t hold height due to a degraded seal, or it becomes stuck and can’t adjust, both requiring straightforward replacement ($20–$60).
- Your chair’s upholstery choice—mesh, fabric, or leather—directly impacts comfort, durability, and maintenance needs, with mesh being breathable and easy to clean, fabric offering acoustic benefits, and leather requiring regular conditioning.
- Before assuming office chair parts are broken, test the issue thoroughly (like cycling the height lever to release air bubbles) and tighten all visible bolts, as many repairs simply require basic maintenance rather than replacement.
Understanding the Base and Casters
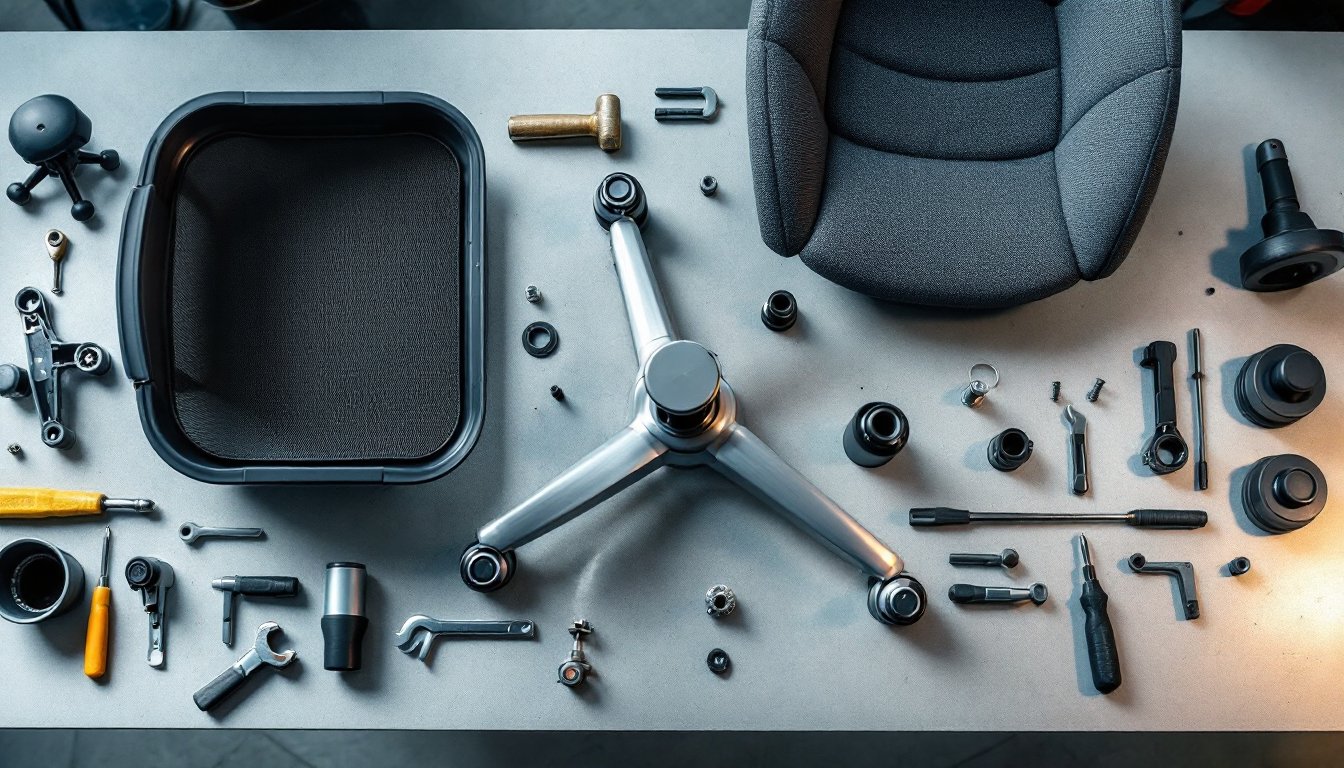
The base is your chair’s foundation, typically a five-point star made of steel or molded plastic. Steel bases are heavier and more durable: plastic bases are lighter and less expensive but more prone to cracking under sustained weight. A standard base sits roughly 25 inches wide and must support a pneumatic cylinder rising from its center.
Casters (the wheels) are where the base meets the floor, and they’re critical for both mobility and stability. Office chairs use soft casters for hard floors (like tile or concrete) and hard casters for carpet. Using the wrong type can damage flooring or cause your chair to roll uncontrollably. Casters come in two sizes: 2 inches and 2.5 inches in diameter, with the larger size offering a smoother roll.
Each caster has a stem that locks into a socket on the base. Over time, casters wear out, flatten, or accumulate debris, making rolling sluggish or uneven. Replacement is straightforward, pull straight up on the wheel (sometimes with a slight twist) to remove the stem, then push the new caster in until it’s fully seated. You can find replacement casters at hardware stores or online for $15–$40 per wheel.
If your chair wobbles, inspect the base for cracks or bent points. Minor cracks can be glued with epoxy, but significant damage means replacing the base entirely, usually a $50–$120 part depending on material and style.
The Hydraulic Cylinder: Your Chair’s Height Adjuster
The hydraulic cylinder (often called a pneumatic cylinder in office chair terminology) is the metal shaft running through the center of your chair’s base. This is what allows you to raise and lower your seat smoothly and stay at your chosen height without constant muscle effort.
A standard office chair cylinder measures 10–12 inches in length and operates on compressed nitrogen gas sealed inside. When you pull the height lever, you’re opening a valve that releases pressure, allowing the piston inside to extend or retract. Quality cylinders are rated for at least 100,000 cycles, roughly four years of daily office work.
Cylinders fail in two ways: they either won’t hold height (the chair slowly sinks when you sit), or they become stuck and won’t adjust at all. A sinking chair usually means the internal seal has degraded, releasing the gas pressure. Unfortunately, cylinders can’t be repaired, only replaced. Replacement cylinders cost $20–$60 and are among the easiest office chair parts to swap. You’ll need a rubber mallet and a screwdriver. Remove the seat by unbolting it from the base, tap the cylinder upward with the mallet to unseat it, slide it out, and insert the new one with a gentle tap downward until snug.
Before assuming the cylinder has failed, test it by lifting your full weight off the seat and pressing the height lever. Sometimes the problem is just air bubbles in the seal, which can be released by cycling the lever ten or fifteen times.
Seat and Backrest Materials
The seat and backrest are where material choice directly affects comfort and durability. Office chairs use three primary upholstery types: mesh, fabric, and leather (genuine or synthetic).
Mesh is breathable and popular in warm climates or for long work sessions. It’s typically woven nylon or polyester over a contoured plastic or foam core. Mesh tears easily if snagged, but small tears can be patched with fabric adhesive. It’s also easy to clean, just vacuum or wipe with a damp cloth.
Fabric upholstery offers comfort and acoustic benefits (it absorbs sound). It’s usually a blend of polyester and cotton over high-density foam. Fabric stains more easily than mesh and requires spot-cleaning or regular upholstery shampoo. Significant wear or staining can be addressed by having the seat re-upholstered, a job best left to a furniture professional.
Leather and synthetic leather are durable and easy to wipe clean but can feel cold and slippery. Genuine leather requires conditioning every 6–12 months to prevent cracking: synthetic leather is lower-maintenance but less breathable.
Underneath the upholstery is the foam core, typically 2–4 inches of high-density foam. Foam compresses over time, especially in high-use chairs. When foam becomes flat and offers no cushioning, you can have it replaced (usually $30–$80 labor plus material) or simply add a seat cushion on top for comfort and protection.
The backrest usually includes lumbar support, a curved insert designed to maintain the natural S-shape of your spine. Some chairs have adjustable lumbar support with a lever or dial that moves the lumbar pad forward or backward. This is one of the most important ergonomic features for preventing back pain during long work sessions.
Armrests and Their Adjustment Mechanisms
Armrests are optional but valuable, they support your arms, reduce shoulder strain, and improve posture during typing. They bolt to the sides of the seat and come in three main styles: fixed (non-adjustable), height-adjustable, and fully adjustable (height, width, and angle).
Fixed armrests are the simplest and most affordable. They’re bolted on and stay put. When they wear or become uncomfortable, you can unbolt and remove them entirely, or replace them with a new pair ($20–$50).
Height-adjustable armrests use a lever or knob beneath the armrest to raise or lower it. Over time, these adjusters wear out and lock in position. Replacement usually requires unbolting the armrest from its mount and sliding out the adjustment mechanism. A replacement mechanism costs around $15–$30, or you can replace the entire armrest assembly for $40–$80.
Fully adjustable armrests add width and angle adjustment, giving more customization but introducing more parts that can fail. They’re pricier ($50–$150 per pair) but worth the cost if you need precise positioning for ergonomic support.
When armrests creak or rattle, tighten the bolts connecting them to the seat using an Allen wrench or Phillips screwdriver, different chairs use different fasteners. If bolts keep loosening, add a small amount of threadlocker (a product like Loctite) to keep them in place. Don’t over-tighten, or you risk stripping the threads.
If an armrest cracks or breaks, you’ll need to replace the arm pad or the entire armrest assembly, depending on severity and the chair model.
Control Levers and Tension Knobs
The levers and knobs on your chair control the tilt, height, and recline tension. Understanding them prevents accidental adjustments and helps diagnose control failures.
The height lever is the most-used control. Pulling it opens a valve in the hydraulic cylinder, allowing you to lower the seat. Pushing it (or releasing it) closes the valve and locks the chair at your chosen height. If the lever feels mushy or won’t engage, the valve may be failing, or the lever mount may be loose. Tighten the bolts connecting the lever to the seat frame, usually accessible from underneath the seat.
The tilt lever (sometimes called a rocker or recline control) adjusts how far back your backrest tilts. Some chairs have a simple forward/backward lever: others have more sophisticated controls that lock the tilt at various angles. If the tilt mechanism is loose or won’t hold position, check for worn pivot pins or damaged lever arms. These repairs are often easier to handle than hydraulic issues but may require partial disassembly.
The tension knob (usually a screw-down dial) controls how much force is required to recline. Tightening it makes the chair harder to tilt: loosening it makes reclining easier. This is purely a preference setting and won’t wear out, but the knob itself can strip if over-tightened.
Some chairs have an armrest tension knob that adjusts how firmly the armrests rotate or adjust. Like the tilt knob, it’s a fine-tuning tool that rarely fails.
If a lever breaks or the mount cracks, you’ll need to replace the lever assembly. These are typically $15–$40 depending on the chair model. Always consult your chair’s manual to identify the correct replacement part.
Common Repairs and Replacement Tips
The good news: most office chair repairs are DIY-friendly. The bad news: it depends on which part fails and what tools you have.
Squeaking and creaking usually come from loose bolts or friction between metal and plastic parts. Tighten all visible bolts with the appropriate wrench or screwdriver. If squeaking persists, apply a thin coat of silicone spray or WD-40 to pivot points and joints. Avoid using oils, they attract dust and can stain upholstery.
Uneven height or sinking chairs almost always point to a failing hydraulic cylinder. Before replacing it, test whether the problem is the cylinder or something else. If the chair loses height even when you’re not sitting in it, the cylinder is leaking. Replacement is straightforward (as described earlier) and usually costs less than hiring a repair service.
Wobbly bases or broken casters are easy fixes. Inspect all five caster stems to ensure they’re fully seated in their sockets. Wiggle each one to check for play. Replace any worn or flat-looking casters. If the base itself is cracked or bent, replacement is the only solution.
Torn upholstery depends on severity. Small tears (less than 1 inch) can be hidden or patched: larger damage requires re-upholstering or replacing the seat cover. Some chair manufacturers sell replacement seat covers separately, which can be cheaper than full re-upholstering.
Height lever failures often just need a tightened bolt. If the valve itself is stuck or leaking, the entire lever assembly may need replacement. Similarly, a broken tilt mechanism usually requires replacing the tilt-control bracket or the full rocker base.
For detailed step-by-step guidance on disassembly and part identification, professional repair guides provide visual references. When deciding whether to repair or replace, consider: parts for a $300 chair rarely cost more than $50–$100 total, making DIY repair worthwhile. For a $150 budget chair, replacement may be more economical.
Always unplug your chair if it has a powered lumbar support or other electronics before starting work. Wear safety glasses if you’re using a mallet or wrench, a slip can hurt. If you’re uncomfortable with mechanical work, office chair repair specialists can handle complex repairs for $75–$150 per service call, plus parts. For issues like pneumatic cylinder replacement and caster repairs, many repairs are simple enough for confident DIYers to tackle with basic hand tools.
Conclusion
Office chair parts may seem mysterious until you spend a few minutes learning what each one does. A sinking chair, squeaky joint, or broken caster doesn’t mean your chair is done, most failures are fixable with inexpensive replacement parts and basic tools. The key is catching problems early, understanding what you’re replacing, and being honest about whether a repair is worth your time versus buying a new chair. Armed with this knowledge, you’ll keep your chair comfortable and functional for years to come.


